SOCK METHOD OVERVIEW:
-Cast-on with sock weight scrap
-Add ribber and work 2 rows
-Switch to sock yarn
-Selvage: Rib one row, knit 2 row, rib remaining
-Cuff: 20 1x1 rows
-Leg: 50 1x3 rows
-Pre-Heel: 10 rows
-Park ribber needles upside down in cylinder slots, tucked into spring
-Remove ribber
-Untuck and rest ribber needles inside cylinder
-Fix any dropped stitches
-Heel (worked between 9-6-3)
-Put resting ribber needles upside back into cylinder slots
-Return ribber back to Machine
-Untuck and unpark needles by transferring back to ribber dial
-Foot: 59 rows
-Swap remaining ribber for cylinder needles
-Work last row
-Remove ribber
-Fix any dropped stitches
-Toe
-Add stitch markers (optional)
-Scrap sock weight yarn
A video has been created to match these written instructions.
Please see the full video at https://tinyurl.com/cuffdownribbedsock1 or https://youtu.be/_yV2-Q7tGhg
See the 5 page written PDF pattern connected to this project on the right and also listed on my website here https://www.csmlove.com/my-youtube-videos
For this example pair of socks I used a Legare CSM, 72 cylinder with 36 slot ribber dial
Please fully read the instructions prior to beginning and work each step clearly knowing where to be for the step afterward.
GENERAL NOTES:
-This method is the same regardless to what CSM, cylinder or ribber is used. You could use this method and choose to skip the ribber parts for a non-ribbed or even mock ribbed sock.
-In order to use the ribber on your machine it’s important that it is TIMED, meaning that its setup to work a specific way.
-A ribber only works going forward (not reverse) which is why I note where one should be on the machine when working certain steps. :) YOU CAN DO IT!
HOW TO CREATE SOCKS THAT FIT DEPENDS ON THE GAUGE!
-I’ve made this sock using my tension setting 3 dial turns from the tightest setting. This is something I determined beforehand.
When wishing to create a specific sized sock it is important to know what you stitch gauge is in relation to your CSM and the yarn attributes. Simply following the same row numbers without having the same gauge will not give you a same sized sock like the one shown here. For tension setting info see https://ravel.me/karenramel/cgs
CUFF DOWN RIBBED SOCK STEPS:
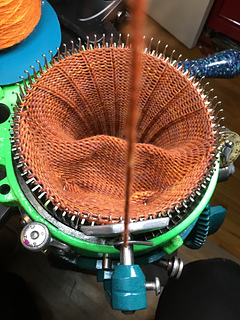
1) Load cylinder needles into each of all the cylinder slots on your machine. (I used a 72 slot cylinder.) Using your Cast-On of choice (I use my Universal Bonnet) with sock weight scrap yarn, add your buckle and stem weights (I use a stem weight with three total weight pucks), work 10-15 rows. Stop yarn carrier at 7pm.
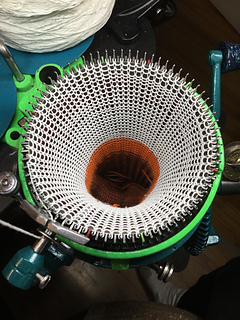
2) Add ribber and ribber needles in 1x1 design from 3pm. As you add the ribber needles in this pattern, transfer the aligned cylinder needle stitch to the ribber needle. Ensure the ribber stitch does not sit behind the latch of the ribber needle after transfer or it will later drop when put into work. Remove the empty cylinder needles after stitch transfer. (You should have one ribber needle, one cylinder needle all the way around. Ribber needles will align with empty cylinder slots).
Note on RIBBER ALIGNMENT to 3pm: Whether you always add a ribber needle directly after 3pm or whether it’s always the second slot from 3pm depends on where your 3pm aligns best with your ribber dial (first or second cylinder needle from 3pm) this will be your “always add a ribber needle point” when adding the ribber for this dial and cylinder. Where it aligns depends on how you’ve marked your cylinders and how much you’ve adjusted the ribber adjuster knob.
3) Continue to work in sock scrap yarn for a couple rows to ensure the newly inserted ribber and ribber needles are working correctly. When you feel its ready work and stop at 3pm.
4) Change to working sock yarn by cutting sock weight scrap yarn and tying the end to your sock yarn. I use the second method more often than not.
The first way is to cut sock scrap two inches from the machine (then threading sock yarn into the top part of the topper and down into the yarn carrier etc). The second way is to cut sock scrap near the yarn source and tying your sock yarn to the end piece (and then gently pulling on yarn from 3pm so that the sock yarn knot threads itself overhead and to your start point).
As the ribber is on the machine, I usually use a very long latch hook to direct the knotted scrap into the space between the ribber and the cylinder before 3pm on the machine. Align sock yarn so that it will start at the first needle after 3pm with scrap and sock yarn tails inside the machine. Ensure latches are open. Follow pattern.
5) MODIFIED SELVAGE: Begin by using the ribber and rib one row overlapping only the first stitch worked. Tappet switch OUT. PIN IN.
6) With ribber out of work we will knit two rows stopping again after overlapping the first stitch again. Tappet IN. PIN still IN. Selvage is done. Continue pattern with ribbing.
NOTE: It takes the ribber the space of four ribber needles to activate or deactivate when putting the Tappet IN or OUT. The original selvage recommended doing steps 5 & 6 by stopping four ribber needles prior to where you started.
7) 1x1 CUFF: Knit 20 rows for the cuff or as desired. Stop spring rest at 3pm in preparation for ribber needle swap to 1x3.
NOTE: Needle swap rows are not included in row numbers.
8) 1x3 LEG: We will now setup for the 1x3 rib (remove every 2nd ribber needle in your 36 slot dial and transfer to cylinder). Our pattern has us working 50 rows for the leg segment of the sock. Stop the yarn carrier at back (12pm).
9) PRE-HEEL SETUP: Swap the heel ribber needles to cylinder needles (ribber needles between 9-6-3 plus any within two needles behind 9 & 3) and ensure the two needles behind the 9 and 3 positions are also cylinder needles. This is done to allow for a better fit above the heel near the ankle.
10) PRE-HEEL: Work 10 rows and stop the yarn carrier at 6pm.
11) REMOVE RIBBER/PARK & REST RIBBER NEEDLES: Socks can definitely be made with the ribber on the machine, however with this plan, we transfer ribber needles to an upside down position into the cylinder, tucking them into the cylinder spring, then remove the ribber altogether. With the ribber cleared away we then untuck the upside down ribber needles from the cylinder slots and rest them on the inside of the machine on the knitting - I call this to Park & Rest the ribber needles. We rest the ribber needles in the middle so that the yarn carrier doesn’t clash and bash any ribber needle butts sitting in cylinder slots as we proceed working the heel in the upcoming steps.
12) Yarn carrier remains at 6pm. Now raise all back needles up and out of work (the non-heel needles at the opposite side of the machine). This plan includes raising needles from the second position behind each halfway mark (behind 3 and 9 o’clock positions). Crank to 12pm. Now we are completely ready to start the heel.
13) REPAIR ANY DROPPED STITCHES: Remove all buckle and weights from the underside of the machine. Add an elastic to the non-raised needles to lock your work into the cylinder needles (otherwise the work will come off and come undone) and then freely lift work up the center to correct any dropped stitches with a latch hook tool. (See video for how to do knit or ribbed dropped stitches). Once work is fixed, return knitted work back to the regular inside position in the machine, add buckle and stem weights and remove the elastic. Engage Heel Spring, return buckle and stem weights and add Heel Weights/Forks.
RIBBING NOTES: As you work, watch for lifting of the sock as you go and adjust the heel weight as needed. Generally if the first couple needles knit without issue, the rest of that row should be fine. Watch for latch closure.
14) HEEL (DECREASE): Lift 2 needles on right (makes interlock stitch). Crank towards 9pm. Stop at 12pm.
15) Lift 2 needles on left (makes interlock stitch. Crank towards 3pm. Stop at 12pm.
16) Lift 1 needle on right. Crank towards 9pm. Stop at 12pm.
17) Lift 1 needle on left. Crank towards 3pm. Stop at 12pm.
18) Continue repeating 16 & 17 until you’ve worked to the hash marks - the yarn carrier should be on the RIGHT.
Always make sure the yarn is under the latch of last needle lowered and latches open.
19) HEEL (INCREASE): Lower 1 needle on right. Crank towards 9pm. Stop at 12pm.
20) Lower 1 needle on left. Crank towards 3pm. Stop at 12pm.
21) Repeat Step 19 & 20 until all needles are down in front of heel hash marks on both sides - carrier should remain on the LEFT after last needle lowering. Crank to 6pm.
22) UNPARK RIBBER NEEDLES/RE-INSTALLING RIBBER: Now we do what we did before but in reverse. The stitch held ribber needles resting inside the machine are once again placed upside down in the cylinder slots, slightly tucked into the cylinder spring. This allows clearance for the return of the ribber to the machine. Install the ribber unit back onto the machine. Align dial to correct current position and transfer the upside down parked ribber needles back into the ribber dial. Ensure to not let the ribber stitch go behind the ribber needles as it will drop. Ensure that the Tappet and Drive pin are both still IN work.
23) Push down back needles (it puts them back into work). Ensure latches are open.
24) FOOT: Work 59 rows and stop yarn carrier at 6pm.
25) Swap remaining ribber stitches/needles to cylinder stitches/needles and do 1 final row, stopping the yarn carrier at 6pm. Remove ribber from the machine. Fix any dropped stitches.
WHY WE DO STEP 25 - Ensuring the final row is all cylinder needles makes it easier to Kitchener (close the toes) when all the stitches are the same on the edge.
26) TOE (DECREASE): Lift all back needles from 3 - 12 - 9. Crank to 12pm.
27) Lift 1 needle on right. Crank towards 9pm. Stop at 12pm.
28) Lift needle on left. Crank towards 3pm. Stop at 12pm.
29) Repeat Steps 20 & 21 until 1 stitch before heel hash marks, last row should be to the RIGHT.
Note: How deep or narrow you choose to work the heel/toe and how close to average heel marks you work during the decrease is preference. Sometimes I work one stitch from the marks sometimes I work right to the marks.
30) TOE (INCREASE): A onetime special step - Lower 2 needles down - 1 on the left and 1 on the right, crank towards 9pm. Stop at 12pm.
31) Lower 1 needle down. Crank towards 3pm. Stop at 12pm.
32) From now on, only 1 needle is lowered on each side. Continue lowering 1 needle per side until all needles on the LEFT are down - there will be one remaining on the right (that’s okay), crank so that the yarn carrier at 6pm.
33) Lower all the raised needles. Work until the stitch before 3pm and stop - your sock is done! Our next step is to cut the sock yarn - be sure to leave yourself enough yarn so that you can close the toes later using Kitchener. (I usually cut my sock yarn on the yarn source side of the top part of the yarn topper/mast).
34) Change to waste sock weight yarn at 3pm and work scrap sock yarn for a minimum 5-10 rows.
If you don’t want to work another sock, and prefer to end, cut your scrap yarn, remove weights from the work/machine and firmly hold knitted work with downward pressure, crank very slowly to remove work from machine. Always be cautious cranking without the machine threaded to prevent latch collision as collisions aren’t always obvious.
If you wish to make the second sock this is what I do.
SCRAP YARN NOTE: I use two kinds of scrap yarn, one of similar sock weight (a cone of acrylic yarn purchased from eBay) and one fiber similar to #10 cotton for doily cotton. My rule of thumb is to always use similar weight scrap when it touches the sock so that the tension remains the same.
SETTING UP NEXT SOCK:
After having worked 5-10 rows of the sock weight scrap yarn, I then switch to any type of lesser fiber and work enough rows so that the prior sock is low enough in the machine so that I can use the buckle and stem weights with even pressure on the whole project. If we only did 5-10 rows of sock weight scrap and began the next sock, the toe side of the prior sock would still need downward weight and this extra weight starting the second sock would change its tension. Start STEP #1 ensuring sock weight scrap yarn is loaded. That’s it!
Feel free to follow me on https://www.instagram.com/karen_ramel
Check out all my YouTube Videos http://youtube.com/c/CSMLove
See me on Facebook https://www.facebook.com/karenramel.csmlove/
Interested in seeing what I’ve done on my CSM? https://www.csmlove.com/my-scrapbook
My email is: karenramel@yahoo.com


 csmlove notebook
  handspun
 queue
queue favorites
 friends
 needles & hooks
 library