I added this ravelry entry way after creating this project.
I created this project after having seen a knitted pouch Cheri created and demonstrated at the Spokane Crank-in event Sept 2018 organized by Kathy Howland. She had a pouch for her buckle weights that she had made which had a I-CORD drawstring closure. Cheri is on YouTube under “knitpickin”
The yarn used here was dyed at home with food color.
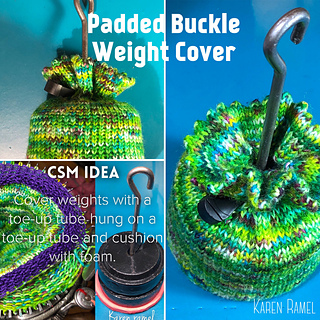
The project is for a pouch on a 54 cylinder (sock yarn) for two weights=1114g/1.114kg/39.3oz/2 lb 7.3oz
I later made a second version of this using a 72 cylinder and heavier yarn for three weights: http://ravel.me/karenramel/sc2t7
This project I created had an improvised design. Using a Legare 400 and a 54 stitch cylinder I started a toe up sock using a YouTube method where the toe was not needing sewing but first….
Using scrap cotton I strung the machine without the heel tension and primed the needles with a cast-on split ring bonnet, slowly turning the crank with buckle and buckle weights on the scrap/bonnet.
Start no sew toe using YOUTUBE Grayson Erlbacher posted video: http://youtu.be/ehreuPhK4mw
(I found this video slightly vague as it jumps around a little. The second project I feel had a better video example of toe up socks)
FIRST: create toe-up pouch to be used inside and end with scrap. Put aside. Its important that this is approximately deep enough to accommodate weight pucks and hook assembly, plus a disc of foam (cut slightly bigger than a circular weight puck).
SECOND: create a second toe-up pouch on the machine of the same depth as the first if not slightly deeper. Hang first pouch inside machine and crank to merge the two layers as one. Crank a couple regular rows of knitting then work a picot (every second stitch hung on the first). This will be the drawstring holes of the pouch. Next after the picot row, I chose to do a hung hem with picot edge to create a frilly edge. I ran scrap yarn and sewed the live stitches closed above the drawstring picots on the inside of the pouch. I chose to use stretchy elastic as my drawstring. Done.


 csmlove notebook
  handspun
 queue
queue favorites
 friends
 needles & hooks
 library